Getting Started
Welcome to Mycorr, the collaborative data platform designed to improve your productivity and bring structure to your data workflows. If you are someone who works with a lot of data, Mycorr will be a time-saver by centralizing your data and transforming your traditional spreadsheets into powerful, structured, and shareable resources.
This guide will introduce you to the core concepts and features that make Mycorr unique.
Why Choose Mycorr?
-
Real-time collaboration and synchronization
Work together with other users in real time. See data changes instantly as they happen.
-
Data versioning
Track every change, create checkpoints, and roll back to previous versions when needed. Our versioning system ensures you never lose important data and can always track your history.
-
Access Management
Control who can view, edit, or share your resources. Define granular permissions for individuals or teams, ensuring your data stays secure and only accessible to the right people.
-
Integration with external datasources
Quickly import data from external datasources and keep your data in sync with external sources.
Ready to Get Started ?
- Learn about Account Management to get access to Mycorr.
- Explore the Resources section for detailed guides on available resources and how to interact with them.
- Explore different Data Sources you can bring data from into Mycorr.
- Check out Data Management to get into the details of different ways to manage your data.
- Visit API Access to learn about accessing your data from external applications.
Account Management
You can get started into Mycorr journey by creating an account.
If you have a Google or a Github account, you can sign up in a matter of seconds. But even if you don’t, you can still create an account in a few simple steps.
Resources
Mycorr's strength lies in its structured and shareable resources made available to its users. It allows them to organize and collaborate on their data with ease without worrying about conflicts or inconsistencies.
To help you get started, the following section provides an overview of what resources defined in Mycorr and how they are structured inside your workspace. Understanding the structure will make it easier for you to crunch the data.
Start by diving into our Resources Structure for a detailed breakdown.
Structure
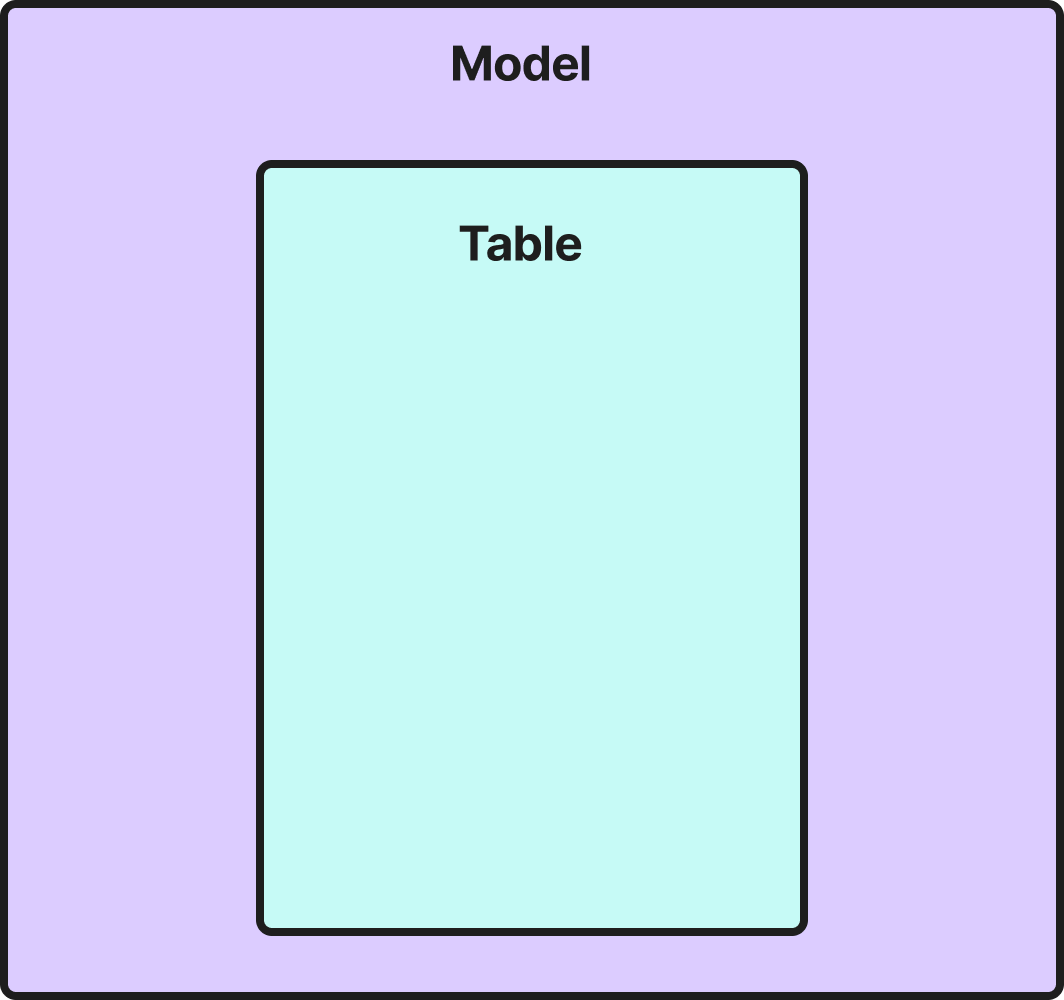
In Mycorr, all data is organized in Models and Tables within them. Think of this as databases and tables in traditional systems.
Tables always have a parent model, from which they can be edited. In that model, they exist in their latest state. When tables are shared to other users, they can import the tables into their own models. When a table is imported into a model, it can only be visualized, but not edited.
Learn more about Sharing of Tables.
Models
Think of Models as folders that hold data together in a single common space. A Model contains one or more Tables, displayed on a shared Canvas where you can collaborate with others and see real-time data changes as they happen.
When you create a Model, you are automatically the Owner of it, which is the highest level of access to the Model.
You can create Models in your private workspace, or within Teams you are a part of.
After the Model is created, you can add Tables to it and start working on your data. You can also share the Model with others, allowing them to collaborate on the same data.
Learn all about Sharing of Models.
Tables
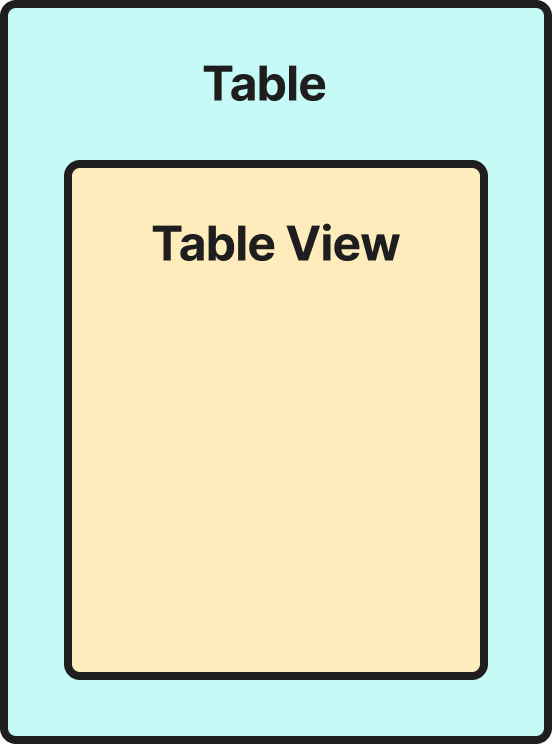
Our Tables are just like tables in a database, that you can create, edit and manage within a Model.
A Table is accessed and visualized through Table Views, of which a Table can have as many as you like. For example, you can create one Table Views that are filtered or sorted differently.
Within a Table View, you can:
- Remove columns
- Add Columns
- Remove Rows
- Add Rows
- Filter Data
- Update Data
Any data changes made within a Table View are persisted to the main Table to ensure data consistency between views. Learn more about Data Management.
In this part, we'll cover the way you can share resources in Mycorr and what permissions you can define for each resource.
Sharing Resources
What can you share?
Resources in Mycorr are private by default, meaning that only you can access them when you create them. However, you can share both models and tables with individual Users or Teams you are a part of, and define the level of access they get to the resource.
How can you share?
- Sharing to Users
In order to share a resource with a group of users, you’ll need their email addresses. By default, once the resource is shared, they will receive both a notification in their Mycorr account and an email with a link to directly access the resource. In other cases, this will depend on the notification settings of the user.
Depending on the access level you choose, the users will be able to directly access the resource as soon as it is shared with them.
- Sharing to a Team
Alternatively, you can share a resource with a team by selecting one of the teams you are a part of. By doing so, all members of the team will have access to it, as per the access level you have chosen.
Permissions
What are permissions?
Permissions are the settings defined when sharing a resource that determine what actions they can perform on the resource and what access level they have.
How can you set permissions?
When sharing a resource, you can choose from a list of permissions that are available. Each one of the resource has its own set of permissions :
- All about Sharing Models.
- All about Sharing Tables.
Sharing Models
As the Model Owner, you are the only one who can invite others to collaborate on your Models by sharing it with Users or Teams you are a part of.
When sharing a Model, you can assign one of these two roles :
- Collaborator : Allows users or teams to edit the Model and Tables within it.
- Viewer : Allows users or teams to view the Model and its Tables but not make changes.
Neither Collaborators nor Viewers can share the Model. Only you, as the Owner, have the permission to do so.
Revoking Access to a Model
As the Model Owner, you can revoke access to a Model at any given time by removing a User or Team from the shared list.
When revoking access, you can choose to allow the User or Team to keep any table (owned by the model) they imported, or you can choose to remove all those imports. When choosing the second option, you revoke access to the model entirely with all its tables.
If you decide to allow them to keep the imports of the tables owned by that model, they will retain the versions they already have of the tables, whether they are behind the original versions or up-to-date, but they will no longer receive updates made to the tables.
Sharing Models
As the Model Owner, you can share Tables owned by the Model individually with Users or Teams, you are a part of, even without sharing the entire Model.
When sharing a Table, you can grant one of these two permissions :
- Can Import : Allows users or teams to import the Table into other Models but not share it with others.
- Can Reshare : Allows both importing the Table into other Models and sharing it with others.
Only you, as the Model Owner, can share a Table and give the re-share permission. Users or Teams who can reshare a Table can only share it again without the ability to grant the re-share permission to whoever they are sharing it with.
Revoking Access to a Table
As the Model Owner, you can revoke access to a Table at any given time by removing a User or Team from the shared list.
When revoking access, if the User or Team has imported the table elsewhere, you can choose to let them keep the imported copies or remove any import of the table.
If you allow them to keep the importeds, they will retain the version they already have of the table in the model(s) they have imported it into, but they will no longer receive updates made to the table.
Ownership Transfer of a Table
As the Model Owner, you can transfer ownership of a Table to another Model, making it the new Parent Model of the Table.
You can transfer ownership to models you own or to models you are collaborator in.
If the Table is imported in the target model we are transferring ownership to and it is not up-to-date with the latest version of the table in the source model, the table's state in the target model will be fast-forwarded to the latest version at the time of the ownership transfer.
When transferring ownership of a table in a model you are Collaborator in, the model Owner will be notified and would need to accept the ownership transfer request.
Data Sources
In Mycorr, tables can originate from different sources. Tables manually created within a Model are Owned by the Model. But you can always bring in data from external sources.
You can access the Import section inside a Model where you can find different options:
- Table Import — bring tables in from other Models you have access to.
- Connections — anything backed by saved credentials: Google Sheets, PostgreSQL, Supabase, Cloud Storage Buckets. Set up a connection once and import from it across any Model.
Other options are doable on the Canvas directly, such as:
Table Import
In the Import section, you will see all the Models you have access to, whether those you own or those that were shared with you. Below each Model, you will find a list of all the tables available there. You can also find a list of Tables that have been explicitly shared with you.
You can reuse those Tables by importing them into the current Model you are working on. In order to do so, you can drag and drop any Table into the Canvas.
If you import Tables from Models where you are a Collaborator or Viewer and the Table is not explicitly shared with you, this action will trigger a request for the Model Owner to share the Table with you. You will need to wait for their approval before you can access the Table.
⚠️ Pending Import Requests
Imported Tables that are waiting for the Model Owner’s response will not appear in the Canvas until the request is approved and you create a Table View based on it.
You can find the pending tables grayed out in the Directory section.
You can choose to cancel the import request at any time.
If you are a viewer of a Model, meaning that you can not edit it, and one of the tables owned by your models have been imported there, you can still control the access to the table.
Data Consistency Across Models
After importing Tables, we make sure that the data in the source Table and the imported Table are consistent across Models.
Whenever changes are made to the original Table, they are detected in the Models where the Table has been imported, allowing you to manually trigger a sync to update the data to the latest state to ensure consistency wherever the Table is.
CSV Upload
You can ingest CSV data into your Models by dragging and dropping a CSV file onto the Canvas.
You can optionally set a specific delimiter (e.g., semicolon, comma, tab…) or header row number for more control over the data you are importing.
⚠️ Note that only .CSV files are accepted for now.
Pasted Data
You can quickly create a new Table by copying and pasting data directly into the Canvas.
A Table will be created and you can start manipulating the data right away.
⚠️ Only Pasted Data is editable. Other external Data sources mentioned are read-only.
Connections
A Connection in Mycorr is a saved set of credentials for an external data source — a PostgreSQL database, a Supabase project, a Google account, a cloud storage bucket. You create a Connection once and reuse it across as many Models as you like.
You manage Connections from Settings → Connections, or create new ones inline from the Import panel inside a Model.
How Connections work
- Saved once, reused everywhere. Connect to your Postgres once and every Model in your account can import tables from it without re-entering credentials.
- Encrypted at rest. Passwords and tokens are encrypted with AES-256-GCM. Mycorr's server cannot read them back as plaintext after storage — only decrypt them in memory at the moment a query runs.
- Owner-scoped. A Connection belongs to the user who created it. Other team members cannot see your saved credentials, even if they share a Model with you.
- Read-only in practice. Mycorr's import code only ever reads:
SELECTon Postgres / Supabase,storage.objectVieweron buckets, and Drive picker-selected files on Google. (The Googledrive.filescope is technically read-write because that's the only Google API for picker-selected files — Mycorr only reads.) - Revocable from your side. Removing access in Postgres, GCP, or Google immediately stops Mycorr from being able to read — the next refresh fails cleanly with a permission error.
Supported connection types
| Type | Use it for | Setup |
|---|---|---|
| Google account | Importing Google Sheets | Google Sheets |
| PostgreSQL | RDS, self-hosted, Heroku, anything Postgres-wire-compatible | PostgreSQL |
| Supabase | A Supabase project (same as Postgres, with helpers for pooler URLs) | Supabase |
| Cloud Storage Bucket | Importing CSV / TSV / Parquet from GCS (S3 + Azure coming) | Cloud Storage Buckets |
Editing and revoking
From Settings → Connections you can:
- Rename a connection (the identity fields — host, database, username — are immutable; rotate the password by editing it).
- Replace the password / CA certificate without recreating the connection.
- Delete a connection. Any tables previously imported through it stay in Mycorr (the data is yours) but can no longer be refreshed — re-create the connection to resume syncing.
What's next
Pick the type you want to set up:
Google Sheets
A Google connection lets Mycorr read spreadsheets from any Google account you control. Imported sheets become Tables inside a Model, and you can re-sync them later to pick up changes.
One Google connection per account per user — you can have several side by side if you work across multiple accounts (e.g. work + personal).
What you need
- A Google account.
- Pop-ups allowed for
mycorr.app(the OAuth flow opens a small Google sign-in window).
That's it. There is no admin step — Google's consent screen is the entire setup.
Connecting your Google account
- Go to Settings → Connections → New Connection (or use the Import panel inside a Model and click "Connect a Google account").
- Pick Google account.
- A Google sign-in pop-up opens.
- Pick the Google account you want to use and approve the consent screen.
- The pop-up closes and the new connection appears in your list, labeled with the email you signed in with.
What Mycorr asks for
The OAuth consent screen requests three scopes:
drive.file— "See, edit, create, and delete only the specific Google Drive files you use with this app." Mycorr can only see spreadsheets you explicitly hand it through the Drive file picker; it cannot enumerate the rest of your Drive.userinfo.email+userinfo.profile— your email address and name, used to label the saved connection in your list.
Mycorr never writes to your spreadsheets in practice — the drive.file
scope is what Google's API requires to read picker-selected files, but
the import code only ever reads.
Importing sheets into a Model
Once the connection is saved:
- Inside a Model, open the Import panel.
- Pick the Google connection.
- The Drive file picker opens — select one or multiple spreadsheets.
- Each selected sheet is imported as its own Table inside the Model.
Drag any imported Table onto the Canvas to start working with it.
Keeping data in sync
After import, each Sheets-backed Table gets a Check for updates button. Click it to pull the latest cell values from the original spreadsheet. Sync covers:
- Row additions and deletions
- Column additions and deletions
- Value updates in cells
There are limits on what sync can detect cleanly across renames / reorders — see Syncing Data from Google Sheets for the rules.
Revoking
Two ways to disconnect:
- In Mycorr: Settings → Connections → click the row → Delete. The connection is removed; any tables you imported stay in your Models but stop syncing.
- In Google: visit myaccount.google.com/permissions, find Mycorr in the list, and click Remove access. The connection in Mycorr will start failing on the next refresh — delete it from Mycorr afterward to clean up.
Either action is enough. Doing both is fine.
Troubleshooting
| Symptom | Fix |
|---|---|
| Pop-up never opens | Allow pop-ups for mycorr.app and click again |
| "Google account didn't match" when re-signing in | You're switching accounts on an existing connection — sign in with the original email, or delete and re-create the connection with the new account |
| Import picker shows "No spreadsheets found" | Either your account has no Sheets, or you skipped the file-picker — re-click Sign in with Google and select the files in the Drive picker |
| Sync fails with "permission denied" after working before | You revoked Mycorr in Google's account permissions — re-create the Mycorr connection |
See also
- Syncing Data from Google Sheets — what sync can and can't detect.
The Sign in with Google button inside the Cloud Storage
Bucket setup runs a separate OAuth flow with
different scopes (openid email profile, for Workload Identity
Federation). Mycorr keeps one Google connection per account per user — if
you already have a Sheets connection for an account and want to use the
same account for Cloud Storage Buckets, delete the existing connection
first and re-create it from the Bucket form.
Syncing Data from Google Sheets
When importing a Spreadsheet into the Canvas, there will be a button for the created Table that allows users to check for updates in the Spreadsheet. If there are any updates found, the system will automatically update the table with the latest data.
Our strategy accounts for:
- Rows Addition/Deletion
- Column Addition/Deletion
- Value Updates in Cells
But, while we offer robust synchronization system, there are some rules to keep in mind to ensure smooth operations and prevent inconsistencies.
Column Reorder
If you move a lot of columns around in your Spreadsheet, our system will treat them as new columns at new positions rather than reordered columns.
Column Renaming
If you rename a column in your Spreadsheet, our system will treat it as a new column at that position rather than a renamed column.
The synchronization doesn't affect the overall structure of the Table in the Canvas. If changes are detected in the Schema and the Table is updated, you will see the correct new order of columns as they appear in the Spreadsheet.
If you need to make significant structural changes, consider re-importing your spreadsheet or contact support for guidance.
PostgreSQL Connection
A Postgres connection lets Mycorr read tables from any Postgres-wire-compatible database — RDS, Cloud SQL, self-hosted, Heroku, Neon, Crunchy Bridge, etc.
For a managed Supabase project, use the Supabase connection type instead — it has helpers for finding the connection string and dealing with poolers.
What Mycorr needs
A user (role) on your database with SELECT on the tables you want
to import. Mycorr never issues anything beyond SELECT and a handful of
information_schema lookups.
We strongly recommend creating a dedicated read-only role rather than reusing an application or admin role:
-- Create the role
CREATE ROLE mycorr_reader WITH LOGIN PASSWORD '<strong-random-password>';

-- Allow connecting to the database
GRANT CONNECT ON DATABASE your_db TO mycorr_reader;

-- Allow seeing the schema(s) you want to expose
GRANT USAGE ON SCHEMA public TO mycorr_reader;

-- Allow reading existing tables
GRANT SELECT ON ALL TABLES IN SCHEMA public TO mycorr_reader;

-- Allow reading tables created in the future too
ALTER DEFAULT PRIVILEGES IN SCHEMA public
  GRANT SELECT ON TABLES TO mycorr_reader;
Repeat the last three statements for every schema you want to import from.
Network access
Mycorr connects to your database over the public internet from its hosting environment. Two things follow:
- Public reachability required. The host you give Mycorr must
resolve to a public IP. Private addresses (
10.x,172.16-31.x,192.168.x,169.254.x, loopback,*.local,localhost) are rejected up front — see the SSRF note in the Security model section. - No static egress IPs published today. If your database firewall needs an allowlist, reach out to support — VPC peering / site-to-site tunnels are on the roadmap. For now the practical setup is "publicly reachable, TLS-required, read-only role".
Setting it up
- Go to Settings → Connections → New Connection.
- Pick PostgreSQL.
- Fill in:
- Name — anything human, e.g. "Prod analytics replica".
- Host —
db.example.comor an IP. Internal hostnames (e.g.localhost,*.local) are rejected. - Port — usually
5432. - Database — the database name (not the cluster name).
- Username — the read-only role you created above.
- Password — the password for that role.
- Require encrypted connection is on by default. Leave it on unless your database is on a trusted private network.
- (Optional) Under Advanced, paste a Custom CA certificate (PEM) if your database uses a private / self-signed CA that isn't in the public trust store (common for RDS proxy, internal PKI). Get the PEM from your DBA.
- Test & save. Mycorr opens one short connection, runs a trivial query, and stores the encrypted credentials.
The host, port, database, and username are immutable after creation — they define the connection's identity. To point at a different database, create a new connection. The password and CA certificate can be updated by editing the connection.
SSL modes
| Setting | Equivalent libpq mode | When to use |
|---|---|---|
| Require encrypted connection ON (default) | verify-full | Always, unless you have a specific reason not to. Encrypts traffic and validates the server's certificate against either the public trust store or your provided CA. |
| Require encrypted connection OFF | disable | Trusted private network only — traffic is unencrypted. |
There is no equivalent of prefer / require (encrypt but don't
validate). If you have a self-signed CA, paste it in the Advanced
section rather than turning off validation.
Finding the connection details
Where to look depends on your provider:
- AWS RDS / Aurora: RDS console → your instance → Connectivity & security → Endpoint is your host, Port is the port. Database / username were set at create time.
- Google Cloud SQL: Cloud SQL console → your instance → Connections → Public IP is the host. Enable "Public IP" and allowlist Mycorr's egress IPs.
- Heroku Postgres:
heroku config:get DATABASE_URL→postgres://user:pass@host:port/database. Parse out each field. - Neon / Crunchy Bridge / Render: each provider shows a connection string on the project dashboard. Parse the URL into its parts.
- Self-hosted: whatever you set in
postgresql.conf/pg_hba.conf.
For Supabase, use the Supabase page — it has provider-specific guidance.
Importing data
Once the connection is saved:
- Inside a Model, open the Import panel.
- Pick the connection.
- Browse schemas → tables → click a table to import it.
- The imported table is fully owned by your Model. You can sync it later from the same panel; sync re-fetches the table contents and overwrites the previous data.
Security model
- Read-only by IAM. The role you create only has
SELECT. Even if Mycorr's code asked for more, your database would refuse it. - Encrypted at rest. The password and (if provided) CA certificate are AES-256-GCM encrypted in Mycorr's database. Other team members cannot see them; Mycorr support cannot read them as plaintext.
- Encrypted in flight. TLS to your database (
verify-fullby default) using either the system trust store or your custom CA. - No SQL injection surface. Mycorr does not run user-supplied SQL.
Schema and table names are validated against
information_schemabefore being interpolated into queries. - No SSRF. Connections to private / metadata / loopback addresses
(
127.0.0.0/8,10.0.0.0/8,172.16-31.0.0/12,192.168.0.0/16,169.254.0.0/16,localhost,*.local) are blocked. Mycorr cannot be used as a proxy into a private network.
Revoking
Two ways:
- In Mycorr: Settings → Connections → click the row → Delete.
- In Postgres:
REVOKEthe role's privileges, drop the role, or rotate the password. Sync will start failing on the next refresh.
Either is sufficient. Both is fine.
Troubleshooting
| Error | Likely cause | Fix |
|---|---|---|
connection refused / failed to lookup address | Wrong host or port, or your database firewall is dropping us | Verify host/port; allowlist Mycorr's egress IPs |
password authentication failed | Wrong username or password | Re-check; rotate the password if needed |
SSL error: certificate verify failed | Server uses a private CA not in the trust store | Paste your CA in Advanced → Custom CA certificate |
database "..." does not exist | Typoed database name (cluster vs database confusion) | Use the database name, not the cluster name |
permission denied for schema X | The role lacks USAGE on the schema | GRANT USAGE ON SCHEMA X TO mycorr_reader; |
permission denied for table Y | The role lacks SELECT on the table | GRANT SELECT ON Y TO mycorr_reader; |
prepared statement "..." already exists | A connection pooler in transaction mode (PgBouncer / Supavisor / PGCat) | Mycorr disables named statements by default — if you still see this, you're hitting a pooler edge case; switch to session mode or the direct connection |
connections to private/internal addresses are not allowed | Your host resolves to an RFC 1918 address | Mycorr can only reach public-internet hosts today; expose the database publicly with TLS, or wait for VPC peering support |
Used by
- Table imports from your database, browseable inside any Model's Import panel.
Supabase Connection
Supabase projects are Postgres under the hood, but Supabase exposes three different endpoints for a given project, with subtly different behavior. The Supabase connection type in Mycorr is a thin wrapper over the PostgreSQL connection with guidance on which endpoint to use.
If you just want the short version: use the Session Pooler endpoint
on port 5432, with the postgres.<project-ref> username and your
project database password. Read on for why.
What you need
- A Supabase project (any plan, free tier works).
- The database password for your project. This is the one you set
during project creation — it's not your Supabase login password
and it's not your anon / service-role key.
- Forgot it? In the Supabase dashboard: Project Settings → Database → Reset database password.
You do not need to create a separate Postgres role for Mycorr —
Supabase exposes the postgres superuser by default, and the pooler
endpoints route through it. If you want stricter least-privilege,
create a dedicated read-only role as described in the Postgres
connection page.
The three Supabase endpoints
In the Supabase dashboard, Project Settings → Database → Connection string shows three options:
| Endpoint | Port | What it is | Use it for Mycorr? |
|---|---|---|---|
| Direct connection | 5432 | Talks straight to Postgres. IPv6-only on the free / Pro plan unless you have the IPv4 add-on. | Only if you have the IPv4 add-on, or if your network has IPv6. |
| Session Pooler | 5432 | Supavisor in session mode — looks like a normal Postgres connection, IPv4-reachable. | Yes — recommended. |
| Transaction Pooler | 6543 | Supavisor in transaction mode. One server connection is multiplexed across many clients per transaction. | Works, but session mode is simpler. |
Why Session Pooler is recommended
- IPv4 by default, so it works from Mycorr's network without any add-ons.
- Behaves like a regular Postgres connection — no transaction-mode pitfalls.
- Same TLS guarantees as the direct connection.
If you specifically want transaction-pooler semantics (e.g. because
that's how the rest of your stack connects), the Transaction Pooler on
port 6543 also works — Mycorr disables named prepared statements so
the typical prepared statement "sqlx_s_1" already exists collision
doesn't occur.
Finding the connection details
In the Supabase dashboard:
-
Go to Project Settings → Database → Connection string.
-
Choose the Session pooler tab.
-
Copy the URI. It looks like:
postgresql://postgres.abcdefghijklmnop:<password>@aws-0-eu-west-1.pooler.supabase.com:5432/postgres -
Parse it into the Mycorr form fields:
Mycorr field From the URI Host aws-0-eu-west-1.pooler.supabase.com(your region differs)Port 5432Database postgresUsername postgres.abcdefghijklmnop(note the dot-suffix — that's your project ref)Password your project database password
The postgres.<project-ref> username format is mandatory on the pooler
endpoints — the project ref tells Supavisor which project to route to.
Setting it up
- Go to Settings → Connections → New Connection in Mycorr.
- Pick Supabase.
- Fill in the fields you parsed from the connection string above.
- Leave Require encrypted connection on (Supabase requires TLS).
- Test & save.
The form is identical to the PostgreSQL one — pick Supabase so the connection is tagged correctly in your list and displays with the Supabase icon.
SSL / TLS
Supabase's pooler endpoints present certificates signed by a public CA,
so Mycorr's default verify-full mode works out of the box — no custom
CA certificate needed.
Permissions
Out of the box, Mycorr will connect as the postgres superuser through
the pooler. That's fine for reading, but it's broader access than
necessary. To follow least-privilege:
-- Run this in the Supabase SQL editor (Project → SQL Editor).
CREATE ROLE mycorr_reader WITH LOGIN PASSWORD '<strong-random-password>';
GRANT USAGE ON SCHEMA public TO mycorr_reader;
GRANT SELECT ON ALL TABLES IN SCHEMA public TO mycorr_reader;
ALTER DEFAULT PRIVILEGES IN SCHEMA public
  GRANT SELECT ON TABLES TO mycorr_reader;
Then use mycorr_reader.<project-ref> as the username in the pooler
URL (the dot-suffix is still required for pooler routing).
If you use Supabase's Row-Level Security, remember that policies
are evaluated against the connecting role — mycorr_reader will see
exactly what your policies allow that role to see.
Importing data
Same as any Postgres connection — see Postgres → Importing data.
Troubleshooting
| Error | Likely cause | Fix |
|---|---|---|
connection refused / failed to lookup address on port 5432 | You used the direct connection string and your network has no IPv6 | Switch to the Session pooler string (still port 5432) |
password authentication failed | Wrong password — most often, you used your Supabase login password instead of the database password | Project Settings → Database → Reset database password, copy the new one |
Tenant or user not found | Username is missing the .<project-ref> suffix on a pooler endpoint | Use postgres.<project-ref> (or <your-role>.<project-ref>) |
SSL error: certificate verify failed | Stale or self-managed CA bundle on your end | Leave Custom CA certificate blank — Supabase's public CA is in the standard trust store |
prepared statement "..." already exists | You're on the transaction pooler (port 6543) and Mycorr's auto-disable of named statements didn't take effect | Switch to the session pooler (port 5432), or contact support |
Revoking
Two ways:
- In Mycorr: Settings → Connections → click the row → Delete.
- In Supabase: rotate the database password (Project Settings → Database → Reset database password) or drop the dedicated role. The Mycorr connection will start failing on the next refresh.
Used by
- Table imports from your Supabase project, browseable inside any Model's Import panel.
Cloud Storage Buckets
A Cloud Storage Bucket connection lets Mycorr read files — CSV, TSV, or Parquet — directly from a cloud storage bucket and import them into a Model as Tables.
Supported providers: Google Cloud Storage (GCS). Amazon S3 and Azure Blob Storage are on the roadmap.
How it works
Once a connection is set up, you can browse your bucket from the Import panel inside a Model. Folders and files appear as a tree — click a file and Mycorr imports it as a new Table in the current Model.
- Per-file import. Each file you click becomes its own Table.
- Fully owned. After import, the Table is yours — edit it, share it, version it. There is no live link back to the bucket.
- Re-import by clicking the file again to bring in a fresh copy as a new Table.
Connecting a bucket
Connections are created from Settings → Connections → New Connection → Cloud Storage Bucket, or from the Import panel inside a Model.
When creating a GCS connection, you provide:
- Access scope — a single bucket (recommended) or your entire GCP project (browse all buckets you have access to).
- Sign in with Google to link your Google account to the
connection. (Mycorr requests only non-sensitive
openid email profilescopes — never access to your Cloud data via OAuth.) - The WIF audience your admin gives you (see below). Mycorr uses Workload Identity Federation: your Google sign-in is exchanged for a short-lived token whose bucket access comes from IAM, not the OAuth grant.
⚠️ Cloud setup is required first. Before the connection will work, someone with admin access to your GCP project needs to grant Mycorr's access. See the GCP Setup page for the commands your admin runs once, then hands you the WIF audience to paste into Mycorr.
Security model
- No long-lived secret in Mycorr. Mycorr never asks for a service account JSON key. Access is brokered by your Google sign-in, exchanged on the fly for a short-lived (1 hour) token to read the bucket.
- No sensitive OAuth scope. Sign-in requests only
openid email profile; the bucket grant lives in your GCP IAM, not the OAuth scope. - Read-only. The roles granted (
storage.objectViewer, optionallystorage.bucketViewer) only allow reading. Mycorr cannot write, modify, or delete anything in your bucket. - Revocable in GCP. Removing the federated principal from the IAM binding (or deleting the WIF provider) cuts off access at the next token refresh — independent of Mycorr.
- Audit trail. Every bucket read shows up in Cloud Audit Logs with
the human user's identity (
principalSubject) attached.
Revoking
Two ways to disconnect:
- In Mycorr: Settings → Connections → click the row → Delete.
- In GCP: remove the principalSet binding, or delete the WIF provider. Full commands in GCP Setup → Revoking access.
Either is sufficient. Both is fine.
Next
- GCP Setup (admin) — the one-time GCP configuration your admin runs to grant Mycorr access.
GCP Setup for Cloud Storage Buckets
This page is for the GCP admin setting up a bucket connection for one or more Mycorr users. Run these commands once, then hand the result (a WIF audience string) to your teammates to paste into Mycorr.
Mycorr uses Workload Identity Federation (WIF): users sign in with
Google, and Mycorr exchanges the user's Google id-token against your WIF
provider for a short-lived federated token that reads the bucket directly.
No service-account keys and no service-account impersonation. The Google
consent screen requests only non-sensitive scopes (openid email profile) — bucket access comes entirely from the IAM bindings you set
below, not from an OAuth scope.
The user's Google identity is the trust anchor; Mycorr never holds a long-lived customer secret.
What Mycorr signs as
Google is the OIDC issuer. The id-token Mycorr presents looks like:
{
  "iss": "https://accounts.google.com",
  "sub": "108234567890123456789",
  "email": "you@yourcompany.com",
  "email_verified": true,
  "hd": "yourcompany.com",
  "aud": "<Mycorr OAuth client_id>",
  "exp": ...
}
Your WIF provider validates the signature against Google's JWKS, checks
the aud against --allowed-audiences, and evaluates your
--attribute-condition against the mapped claims.
Setup
Prerequisites
- A GCP project with Cloud Storage, IAM, and Security Token Service APIs enabled.
- A GCS bucket.
gcloudauthenticated withiam.workloadIdentityPoolAdminandstorage.admin.- Mycorr users sign in with Workspace Google accounts. Personal
@gmail.comaccounts have nohdclaim and will fail the default org-domain condition (usually what you want).
Step 1 — Set variables
export PROJECT=your-gcp-project
export BUCKET=your-bucket-name
export MYCORR_HOST=https://mycorr.app   # use your Mycorr deployment's URL
gcloud config set project $PROJECT
PROJECT_NUM=$(gcloud projects describe $PROJECT --format='value(projectNumber)')

# Mycorr's allowed-audience — the bare OAuth client_id Google sets as
# the `aud` claim on user-OAuth id-tokens. Stable per Mycorr deployment.
# (Mycorr also shows this value inline on the connection form.)
MYCORR_AUDIENCE=$(curl -s $MYCORR_HOST/api/public/federation/config | jq -r .allowed_audience)

# The user (or domain) you want to authorize.
USER_EMAIL=you@yourcompany.com
USER_DOMAIN=${USER_EMAIL#*@}
Step 2 — Create the Workload Identity Pool + Provider
gcloud iam workload-identity-pools create mycorr-pool \
  --location=global --project=$PROJECT

gcloud iam workload-identity-pools providers create-oidc mycorr-issuer \
  --workload-identity-pool=mycorr-pool --location=global --project=$PROJECT \
  --issuer-uri="https://accounts.google.com" \
  --allowed-audiences="$MYCORR_AUDIENCE" \
  --attribute-mapping="google.subject=assertion.sub,attribute.email=assertion.email,attribute.org=assertion.hd" \
  --attribute-condition="attribute.email == '$USER_EMAIL'"

# Or trust every user in your Workspace domain — swap the last flag:
# --attribute-condition="attribute.org == '$USER_DOMAIN'"
The three flags doing real work:
--issuer-uri=https://accounts.google.com— Google is the OIDC issuer; GCP fetches Google's JWKS to verify token signatures.--allowed-audiences=$MYCORR_AUDIENCE— required. Without it, STS only accepts tokens whoseaudequals the provider resource name.--attribute-condition=...— the security gate. Email-pinned for one user, orattribute.orgfor whole-org trust.
Step 3 — Grant the federated principalSet read on your bucket
Bucket-scoped (recommended):
PREFIX="principalSet://iam.googleapis.com/projects/$PROJECT_NUM/locations/global/workloadIdentityPools/mycorr-pool"

# Anyone in your Workspace domain:
PRINCIPAL_SET="$PREFIX/attribute.org/$USER_DOMAIN"

# Or a specific user:
# PRINCIPAL_SET="$PREFIX/attribute.email/$USER_EMAIL"

gcloud storage buckets add-iam-policy-binding gs://$BUCKET \
  --member="$PRINCIPAL_SET" --role=roles/storage.objectViewer
Project-scoped: grant both bucketViewer (to enable buckets.list)
and objectViewer at the project level:
gcloud projects add-iam-policy-binding $PROJECT \
  --member="$PRINCIPAL_SET" --role=roles/storage.bucketViewer

gcloud projects add-iam-policy-binding $PROJECT \
  --member="$PRINCIPAL_SET" --role=roles/storage.objectViewer
Step 4 — Hand the audience string to the Mycorr user
echo "//iam.googleapis.com/projects/$PROJECT_NUM/locations/global/workloadIdentityPools/mycorr-pool/providers/mycorr-issuer"
What the Mycorr user does in the app
- New Connection → Cloud Storage Bucket → Google Cloud Storage.
- Access scope: Single bucket (and the bucket name) or Entire project.
- Click Sign in with Google (consents to non-sensitive
openid email profileonly). - Paste the audience string from Step 4 into WIF audience. (Mycorr shows the matching client ID inline for cross-checking.)
- Test connection and Save.
Revoking access
# Remove the principalSet binding (other resources unaffected):
gcloud storage buckets remove-iam-policy-binding gs://$BUCKET \
  --member="$PRINCIPAL_SET" --role=roles/storage.objectViewer

# Tighten the condition (kicks off any user no longer matching):
gcloud iam workload-identity-pools providers update-oidc mycorr-issuer \
  --workload-identity-pool=mycorr-pool --location=global \
  --attribute-condition="attribute.email == 'specific-user@$USER_DOMAIN'"

# Nuclear — delete the provider (all Mycorr federation against it stops
# on next refresh):
gcloud iam workload-identity-pools providers delete mycorr-issuer \
  --workload-identity-pool=mycorr-pool --location=global
In-flight 1-hour federated tokens stay valid until expiry; deleting the provider cuts off new exchanges immediately.
Troubleshooting
| Error in Mycorr | Likely cause | Fix |
|---|---|---|
linked Google connection not found | User hasn't signed in, or removed the Google connection | Click Sign in with Google again on the connection form |
Google STS exchange failed (400): invalid_target | WIF audience string mismatch | Re-copy the audience from Step 4 |
Google STS exchange failed (400): allowed audiences not configured | --allowed-audiences missing or wrong | Re-create the WIF provider with the flag |
Google STS exchange failed (400): audience does not match | --allowed-audiences includes a prefix — Google sets aud to the bare client_id | Use MYCORR_AUDIENCE exactly as /api/public/federation/config returns it |
Google STS exchange failed (403): attribute condition not satisfied | User identity (email / hd) doesn't match the condition | Check the condition expression; the user should sign out and back in if they signed in before the field was added |
403 storage.buckets.list permission denied (project scope) | principalSet has objectViewer but not bucketViewer | Add roles/storage.bucketViewer at project level |
403 storage.objects.list permission denied | Bucket IAM doesn't include the federated principalSet | Re-check the bucket binding step |
ALREADY_EXISTS creating WIF pool / provider | GCP soft-deletes for 30 days | Use undelete + update-oidc, or pick a new name |
Audit logging
The federated principal encodes the user's stable sub in
principalSubject. Cross-reference against your IdP / Workspace directory.
resource.type="gcs_bucket"
resource.labels.bucket_name="$BUCKET"
protoPayload.authenticationInfo.principalSubject=~"workloadIdentityPools/mycorr-pool"
Note on OAuth scopes
The Google consent screen requests only non-sensitive scopes:
openid, email, and profile. Mycorr needs the openid id-token to
federate — it never asks for a Cloud Storage or cloud-platform scope, so
there is no "View and manage your data across Google Cloud services"
prompt and no Google sensitive-scope verification.
What Mycorr can do with your bucket is bounded entirely by your IAM:
the federated principalSet is granted only storage.objectViewer
(+ bucketViewer for project scope) — read-only on the bucket. The OAuth
grant proves who the user is; your IAM bindings decide what they can
read.
Data Management
Mycorr is all about efficiently managing data. The platform is designed to help you organize, track, and collaborate on your data.
For more details on specific aspects of data management, see the sections below:
Data Versioning
One of the most important features in Mycorr is data versioning, which ensures that every significant change to your table is tracked and recoverable. This ensures a robust collaboration and provides the ability to restore previous states of your tables.
Table Versions
Each Table has a Snapshot at any given version. A Table Snapshot holds the Table Version, the Table Meta and the Table Schema at that version.
The Table Meta includes the metadata about rows, and on the other hand, the Table Schema includes the metadata about columns and the overall schema of the table.
Each data operation performed on a table, such as editing the schema, rows or modifying the data itself, results in the creation of a new Table Version. This ensures that you always have a complete history of meaningful changes.
Operations that do not affect the data or schema, such as resizing the table views, do not increment the Table Version.
Checkpoints
You can define a checkpoint for any table version. A checkpoint acts as a restorable point in your table's history.
Each table version can have one checkpoint.
Checkpoints can be deleted at any time.
Aliases
Aliases provide a way to give a table version a human-friendly name. When you rename a checkpoint, you are creating or updating an alias.
You can create many aliases for a Table Version, and you can set one of them as the default name for the Table Version.
Aliases can be deleted at any time.
Restoring and Checking Out
- Owned Tables: If the Table is Owned, meaning that you are working in it's parent Model, you can restore it to any checkpoint, effectively rolling back to that point in history.
- Imported Tables: For tables you have imported from other Models, you can only view a certain checkpoint, not restore or modify the original table.
Data Filtering
Data Commits
Teams
You can kick-off collaboration the right way by creating a Team and inviting members on board. By doing so, you get to collectively manage resources with different users within a single shared workspace.
You, as a user, can create a team or be invited to one at any given time. We distinguish two roles within a Team :
Admin
This is the highest access-level. When creating a Team, you are automatically assigned as the Admin.
An Admin is a member who has full control over the Team and can perform most of the actions within the Team.
Member
When you are invited to a Team, you are assigned as a Member.
Unless you are assigned the Admin role alongside the invitation or later on, you will have limited administrative access to the Team but you can still contribute to the resources within the Team and collaborate effectively.
Depending on the Team role you have, you can perform different actions within the Team. Learn about Team Management
Creating a Team
When creating a Team, here are the steps you can follow:
- Access the Teams section from the left sidebar menu.
- Click on the "Create Team" button.
- Enter the Team's required metadata.
- Click on the "Create" button to create the Team.
For Team's Metadata, only the name is required. The description is optional and the color will be set to default if not specified.
You can invite members to your Team alongside the creation or you can add them later from the Team's page.
Team Management
Inside a team, Mycorr maintains the same fundamental structure, but adds a layer where models are grouped together in a shared workspace.
For team management, we distinguish two types of roles : Team-Level Roles and Model-Level Roles that are inherited through team membership.
Team-Level Roles
Team-level roles determine what administrative actions users can perform within the team structure itself.
| Actions | Admin | Member |
|---|---|---|
| Edit Team Metadata | ✅ | ❌ |
| Delete Team | ✅ | ❌ |
| Leave Team | ✅ | ✅ |
An admin can only leave a team if they are not the last admin in the team.
| Actions | Admin | Member |
|---|---|---|
| View Members | ✅ | ✅ |
| Add Members | ✅ | ❌ |
| Delete Members | ✅ | ❌ |
| Update Member Roles | ✅ | ❌ |
Model-Level Roles
Users inherit model-specific permissions based on their team membership and also their relationship to the models themselves.
Creating a Model within a Team
You can directly create a Model inside the Team and set the team's access-level to the Model. By doing so, all team members will inherit it.
The access-level of a team to a Model could either be a Collaborator or a Viewer. See what actions each role can perform on the Model.
If you are already a collaborator of the model outside of the team, meaning that the model was explicity shared with you, and the model is shared with the team with viewer access only, you will have the highest level of access. In this case, you will be a collaborator of the model inside the team.
Not only you can manually create models inside a team, but you can also link one of your models from your private workspace to a team, and similarily set the access-level of the team to this model.
Models Management within a Team
| Action | Admin | Member |
|---|---|---|
| Add Models | ✅ | ✅ |
| View Models | ✅ | ✅ |
| Edit Models | Only Owner/Collaborator | Only Owner/Collaborator |
| Dissociate Models | ✅ | Only Owner |
Dissociating a model means that the model will no longer be shared with the team, but remains in the user's private workspace.
API Access
Mycorr provides multiple ways for users to access their data from external applications :
- Personal Access Tokens : Secure API keys for programmatic access
- SDKs :
- MCP Server : Connect AI assistants like Claude to query your data in natural language
Personal Access Tokens
Personal Access Tokens (PATs) are secure API credentials that allow you to authenticate and access your data in Mycorr from external applications. They are implemented using JWT (JSON Web Tokens), making them encrypted, secure and easy to use.
Creating a Personal Access Token
Step 1: Navigate to Access Page
- Log into your mycorr account.
- Navigate to the Access section in the left menu.
- Click on Generate button.
Step 2: Configure Your Token
- Name: Give your token a descriptive name.
- Scope: Choose the level of access needed :
- Read: Access to view data and resources
- Expiration: Set an expiration date of the token.
Step 3: Save your Token
Important: Once your token is generated, make sure to copy and save it immediately. For security reasons, you won't be able to view it again.
Mycorr SDKs
Access your Mycorr data programmatically using official SDKs.
Available SDKs
- Python SDK (pymycorr) — Fetch tables as pandas or polars DataFrames.
Python SDK (pymycorr)
The official Python client for accessing Mycorr table data programmatically. It uses Apache Arrow for efficient data transfer and returns data as pandas or polars DataFrames.
Installation
pip install pymycorr
⚠️ Requires Python 3.10 or higher.
Authentication
pymycorr authenticates using a personal access token. You can provide it in three ways:
- Environment variable — set
MYCORR_API_TOKENin your shell:
export MYCORR_API_TOKEN="your-api-token"
.envfile — create a.envfile in your project directory:
MYCORR_API_TOKEN=your-api-token
- Constructor parameter — pass the token directly:
from pymycorr import MyCorr

client = MyCorr(token="your-api-token")
To generate a token, see Personal Access Tokens.
⚠️ Never commit API tokens to version control. Use environment variables or a
.envfile that is listed in your.gitignore.
Quick Start
from pymycorr import MyCorr

# Initialize the client (reads MYCORR_API_TOKEN from env)
client = MyCorr()

# Fetch a table as a pandas DataFrame
df = client.get_table("your-table-id")
print(df.head())

# Fetch a specific version
df_v2 = client.get_table("your-table-id", version=2)

# Fetch as a polars DataFrame instead
df_polars = client.get_table("your-table-id", engine="polars")

# Get table metadata without downloading data
info = client.get_table_info("your-table-id")
print(info["schema"])
API Reference
MyCorr(url=None, token=None, env_file=None, progress="auto")
Creates a new client instance.
| Parameter | Description |
|---|---|
url | API endpoint. Defaults to the Mycorr production URL. |
token | API token. If not provided, reads from MYCORR_API_TOKEN env variable. |
env_file | Path to a .env file. Defaults to .env in the current directory. |
progress | Progress display: "auto", True, or False. |
get_table(table_id, version=None, engine="pandas", progress=None)
Fetches table data as a DataFrame.
| Parameter | Description |
|---|---|
table_id | The table identifier (found in the table URL). |
version | Version number (int) or alias ("latest", "stable"). Defaults to the latest version. |
engine | "pandas" (default) or "polars". |
progress | Override the client-level progress setting for this request. |
get_table_info(table_id, version=None)
Returns table metadata and schema as a dictionary, without downloading the full dataset.
| Parameter | Description |
|---|---|
table_id | The table identifier. |
version | Version number or alias. Defaults to the latest version. |
Error Handling
pymycorr raises specific exceptions for different error scenarios:
| Exception | Description |
|---|---|
TableNotFoundError | The requested table does not exist or you don't have access. |
QuotaExceededError | Your egress quota has been exceeded. |
TableConversionError | Failed to convert the data to a DataFrame. |
StreamingError | Error during data streaming. |
TableAPIError | Base exception for all API errors. |
from pymycorr import MyCorr
from pymycorr.exceptions import TableNotFoundError

client = MyCorr()

try:
    df = client.get_table("your-table-id")
except TableNotFoundError:
    print("Table not found — check the table ID and your permissions.")
MCP Server
The Mycorr MCP Server is a remote Model Context Protocol server that lets AI assistants — such as Claude — explore and query your Mycorr data in natural language. Once connected, an assistant can find the right Tables across your Models, inspect their schema, summarize columns, and run read-only SQL — all scoped to exactly the data you already have access to.
It turns Mycorr into an analytics backend for AI agents: instead of exporting data or writing glue code, you ask a question in plain language and the assistant discovers the relevant tables, understands their structure, and computes the answer against your live (or released) data.
The server is read-only. It can read and analyze your data, but it can never create, modify, or delete it.
What you can do with it
- Ask questions in plain language — "How many orders shipped last month?", "What's our total revenue by region?", "Which customer segment is growing fastest?" The assistant translates these into the right discovery and query calls.
- Explore data you forgot you had — search across every Model and Table you can access by topic, name, or description in a single step.
- Understand a table before querying it — schema, row counts, column statistics, and the joinable relationships (Links) between tables.
- Run analytical SQL — aggregations, window functions, CTEs, and joins across linked tables, with results returned as structured rows.
- Released tables stay consistent — when a Table has a release (a specific version your team has pinned and published), every read goes against that released version, not the live data that may still be changing. So when an assistant runs
describe_table,summarize_column, orrun_sqlagainst a released table, the schema, row counts, and totals it reports are the published numbers — the same ones your team sees — even if the table has been edited since the release. Tables that have no release simply serve their current data.
Connecting
Endpoint
| URL | https://space.mycorr.app/mcp |
| Transport | Streamable HTTP |
| Authentication | OAuth 2.0 (recommended) — or a Personal Access Token |
Authentication
The server supports two ways to authenticate:
- OAuth 2.0 (recommended). When you add Mycorr as a connector in a client that supports OAuth — such as Claude — you're redirected to sign in to Mycorr and authorize access. No token is copied by hand, and access follows your account's existing permissions. This is the standard flow for the Claude connectors directory.
- Personal Access Token (alternative). For desktop or CLI clients that connect with a static credential, send a Personal Access Token (PAT) as a bearer token in the
Authorizationheader.
Either way, the assistant can only ever see the Models and Tables your account already has access to — sharing and permissions are enforced on every request. See Sharing and Permissions.
Connecting from Claude (OAuth)
Add Mycorr as a custom connector:
- Open Settings → Connectors → Add custom connector.
- Set the URL to
https://space.mycorr.app/mcp. - Click Connect and sign in to Mycorr when prompted — Mycorr will ask you to authorize the connection, then return you to Claude.
That's it — there's no token to copy. You can revoke the connection at any time from Mycorr or from your Claude connector settings.
Connecting with a Personal Access Token
Clients that read an mcpServers configuration block (for example Claude Desktop or Claude Code) can connect with a Personal Access Token sent in the Authorization header:
{
  "mcpServers": {
    "mycorr": {
      "url": "https://space.mycorr.app/mcp",
      "headers": {
        "Authorization": "Bearer ${MYCORR_API_TOKEN}"
      }
    }
  }
}
Your token needs the Read scope.
⚠️ Treat your token like a password. Store it in an environment variable (
MYCORR_API_TOKEN) rather than hard-coding it, never commit it to version control, and revoke it from the Access page if it's exposed.
Tools
The server exposes six read-only tools. A typical session moves from discovery (find the right table) to introspection (understand its shape) to execution (compute the answer).
search
The entry point for any question that mentions data by name or topic. Searches names and descriptions across every Model and Table you can access in one round trip, using fuzzy matching that tolerates typos and separator differences. Each hit carries a relevance score and the field that matched.
| Parameter | Type | Description |
|---|---|---|
queries | string[] | 1–10 search phrases (3–256 characters each). |
model_id | string | Optional. Restrict the search to a single Model. |
include_descriptions | boolean | Optional, default true. Also match human-written descriptions. |
limit | integer | Optional, default 25 (max 100). Maximum hits to return. |
list_models
Enumerates every Model you own or can access, with each Model's id, name, description, and table count. Best for "show me everything I have." Takes no parameters.
list_tables
Lists every Table in a given Model — id, name, description, and current version.
| Parameter | Type | Description |
|---|---|---|
model_id | string | The Model to list tables for. |
describe_table
Returns a Table's full shape: name, description, current version, total row count, per-column schema (id, name, data type, nullability, and category labels for categorical columns), and the declared Links to other tables. The links array is the only valid source of join keys for run_sql.
| Parameter | Type | Description |
|---|---|---|
table_id | string | The Table to describe. |
include_sample_rows | boolean | Optional, default false. Include a few example rows. |
sample_rows_n | integer | Optional, default 3 (1–5). Number of sample rows. |
Sample rows let the assistant see a few real rows alongside the schema — handy for spotting how columns are actually populated before writing a query. They're off by default (schema only); set
include_sample_rowstotrueto include them.
summarize_column
Computes column-level statistics for a single column — always row count, null count, and null rate, plus type-specific extras:
- Numeric: min, max, sum, average, median, quartiles, and deciles.
- Categorical: each category's label, count, and percentage.
- Timestamp / date: earliest and latest values, plus monthly or yearly counts.
- String / boolean: most frequent values and how much of the column they cover.
| Parameter | Type | Description |
|---|---|---|
table_id | string | The Table containing the column. |
column_id | string | The column to summarize. |
limit | integer | Optional, default 50 (1–1000). Cap on returned value counts. |
run_sql
Runs a read-only SQL query against your Tables. See Querying with SQL below for the full contract.
| Parameter | Type | Description |
|---|---|---|
sql | string | A single read-only statement (SELECT / WITH / UNION / recursive CTE). |
max_rows | integer | Optional, default 10,000 (max 100,000). Result-row cap. |
Querying with SQL
run_sql uses the DataFusion SQL dialect and is strictly read-only — SELECT, WITH, UNION, INTERSECT, EXCEPT, recursive CTEs, and window functions are supported. Any statement that writes or changes state (INSERT, UPDATE, DELETE, DDL, COPY, SET, EXPLAIN) is rejected.
A few rules keep queries safe and correct:
- Reference tables and columns by id, not by name. Use the ids returned by
describe_table(e.g."tab-019e…","col_xxx"), wrapped in double quotes so the hyphens are read literally. - Joins are only allowed on declared Links. A join on any other column pair is rejected — use
describe_tableto discover valid join keys. Cross joins are not allowed. - Soft-deleted rows are excluded automatically. You never see deleted rows, and there is no column to query them.
- Released tables read their pinned cut. Query results reflect the released version, which may be older than today's live data.
Limits per query: up to 100,000 result rows, 1 GiB of memory, and a 30-second timeout.
Recommended workflow
search(orlist_tables) to find the relevant tables by name or topic.describe_tableto get column ids, types, and joinable links.run_sqlusing those table and column ids.
Example prompts
These show the kind of natural-language requests the server is built to answer. The assistant chooses and chains the tools for you.
Discovery → summary
"Find anything related to billing in my Mycorr data and tell me the total amount invoiced this year."
The assistant calls search(["billing", "invoice"]), picks the matching table, and either summarize_column (for a single total) or run_sql (for a grouped total).
Schema-aware aggregation
"In my orders table, what's the average order value by region?"
The assistant calls describe_table to learn the column ids and types, then issues a run_sql GROUP BY query.
Cross-table join
"Which product categories drive the most revenue from our enterprise customers?"
No single table holds this answer, and you don't have to name the tables. The assistant uses search and describe_table to find the relevant tables on its own, discovers how they relate through declared Links, and writes a single query that joins along those links and aggregates revenue by category for enterprise customers.
Distribution check
"How is the status column distributed in my support tickets table?"
The assistant calls summarize_column and reports the category breakdown with percentages.
Limits, permissions & data handling
- Read-only. The server exposes no write operations of any kind. It cannot modify your Models, Tables, or data.
- Per-user access control. Every request is authorized against your account. You only ever see Models and Tables you have access to, exactly as defined by Sharing and Permissions. Tables shared with you read-only stay read-only here.
- Trashed items are hidden. Models and Tables in the trash are excluded from discovery; querying one by id returns a clear error.
- Rate limiting. Requests are rate-limited per connection. If you exceed the limit you'll receive a
429response with aRetry-Afterhint; the assistant will back off and retry. - Data handling. Queries run against your data within Mycorr's infrastructure and return only the results to the connected assistant. No data is shared with third parties beyond the AI client you explicitly connect. See the Privacy Policy.
Support
Questions or issues with the MCP server? Reach us at support@mycorr.app.
Billing
Plans
Legal
Terms of Service
1. Acceptance of Terms
By accessing or using MyCorr ("Service"), you agree to be bound by these Terms of Service ("Terms"). If you do not agree to these Terms, you must not access or use the Service.
These Terms constitute a legally binding agreement between you and Recons Ltd, a company incorporated in England and Wales with its registered office in London, United Kingdom ("Recons Ltd", "we", "us", or "our").
You must be at least 16 years of age to use the Service. By using the Service, you represent and warrant that you are at least 16 years old. If you are using the Service on behalf of an organisation, you represent and warrant that you have the authority to bind that organisation to these Terms.
2. Definitions
- "Content" means any data, text, files, schemas, table structures, database configurations, or other materials that you upload, create, store, or transmit through the Service.
- "Service" means the MyCorr web application, including all features, tools, and APIs provided at mycorr.app or any successor domain.
- "User" means any individual who accesses or uses the Service, whether as a registered account holder or otherwise.
3. Description of Service
MyCorr is a collaborative data modelling and database management platform that enables teams to model database schemas, manage data with real-time synchronisation, and handle data imports from various sources including CSV, Parquet, and Google Sheets.
4. Alpha/Beta Disclaimer
The Service is currently in an ALPHA/BETA development phase. This means:
- The Service is provided for evaluation and testing purposes.
- Features may be incomplete, contain errors, or behave unexpectedly.
- Features may be added, changed, or removed at any time without notice.
- Data loss or corruption may occur. You are solely responsible for maintaining backups of your Content.
- The Service may experience downtime, interruptions, or performance degradation.
- We make no guarantees regarding uptime, availability, or reliability during the alpha/beta phase.
- We reserve the right to discontinue the Service, or any part of it, at any time without notice or liability.
- We may reset, delete, or migrate data at any time during the alpha/beta phase.
YOU ACKNOWLEDGE AND AGREE THAT THE SERVICE IS IN AN ALPHA/BETA STAGE AND THAT YOUR USE OF THE SERVICE IS AT YOUR OWN RISK.
5. User Accounts
- (a) You must authenticate using Google OAuth to create an account. You are responsible for maintaining the security of your Google account credentials.
- (b) You are responsible for all activities that occur under your account.
- (c) You must notify us immediately at support@mycorr.app if you become aware of any unauthorised use of your account.
- (d) You may not create multiple accounts for the same individual.
- (e) We reserve the right to suspend or terminate accounts that we reasonably believe are compromised or being misused.
6. User Responsibilities
You agree to:
- Provide accurate and complete information when using the Service.
- Use the Service only for lawful purposes and in compliance with all applicable laws and regulations.
- Comply with all applicable data protection laws when storing personal data of third parties in the Service.
- Not use the Service in any manner that could damage, disable, overburden, or impair the Service.
7. Acceptable Use
You agree not to:
- Attempt to gain unauthorised access to the Service, other user accounts, or any systems or networks connected to the Service.
- Interfere with or disrupt the Service or servers or networks connected to the Service.
- Upload, transmit, or store any malicious code, viruses, or harmful content.
- Use the Service to store or process data that is subject to specific regulatory requirements (such as protected health information under HIPAA or payment card data under PCI DSS) unless you have independently ensured compliance with those requirements.
- Scrape, crawl, or use automated means to access the Service without our prior written consent.
- Reverse engineer, decompile, disassemble, or otherwise attempt to derive the source code of the Service.
- Circumvent, disable, or interfere with any security features of the Service.
- Use the Service to infringe upon the intellectual property rights of any third party.
- Impersonate any person or entity or misrepresent your affiliation with any person or entity.
- Use the Service for any illegal or unauthorised purpose.
8. User Content and Data Ownership
- (a) You retain all ownership rights in your Content. We do not claim ownership of any Content you upload, create, or store through the Service.
- (b) By using the Service, you grant us a limited, non-exclusive, worldwide, royalty-free licence to use, copy, store, transmit, and display your Content solely to the extent necessary to provide, maintain, and improve the Service.
- (c) You are solely responsible for the legality, reliability, appropriateness, and intellectual property ownership of your Content.
- (d) You represent and warrant that you have all necessary rights and permissions to upload and use your Content through the Service.
- (e) We may remove or disable access to Content that we reasonably believe violates these Terms or applicable law.
9. Intellectual Property
The Service, including its original content, features, functionality, design, source code, and underlying technology, is owned by Recons Ltd and is protected by international copyright, trademark, patent, trade secret, and other intellectual property laws. Our trademarks and trade dress may not be used in connection with any product or service without our prior written consent.
10. Feedback and Suggestions
If you provide us with any feedback, suggestions, ideas, or recommendations regarding the Service ("Feedback"), you hereby assign to us all rights, title, and interest in such Feedback. We shall be free to use, disclose, reproduce, licence, and otherwise distribute and exploit the Feedback without restriction or obligation to you of any kind.
11. Third-Party Services
The Service integrates with third-party services, including Google (for authentication, Google Sheets import, and cloud storage). Your use of these third-party services is subject to their respective terms of service and privacy policies. We are not responsible for the availability, accuracy, or content of any third-party services, and we do not warrant or endorse any third-party services.
12. Privacy
Your privacy is important to us. Our collection and use of personal data is governed by our Privacy Policy, which is incorporated into these Terms by reference. By using the Service, you consent to the collection and use of your data as described in the Privacy Policy.
13. WARRANTY DISCLAIMERS
THE SERVICE IS PROVIDED ON AN "AS IS" AND "AS AVAILABLE" BASIS, WITHOUT WARRANTIES OF ANY KIND, EITHER EXPRESS OR IMPLIED. TO THE FULLEST EXTENT PERMITTED BY APPLICABLE LAW, RECONS LTD EXPRESSLY DISCLAIMS ALL WARRANTIES, WHETHER EXPRESS, IMPLIED, STATUTORY, OR OTHERWISE, INCLUDING BUT NOT LIMITED TO:
- IMPLIED WARRANTIES OF MERCHANTABILITY, FITNESS FOR A PARTICULAR PURPOSE, AND NON-INFRINGEMENT.
- WARRANTIES THAT THE SERVICE WILL BE UNINTERRUPTED, TIMELY, SECURE, OR ERROR-FREE.
- WARRANTIES THAT THE RESULTS OBTAINED FROM USE OF THE SERVICE WILL BE ACCURATE OR RELIABLE.
- WARRANTIES THAT DEFECTS IN THE SERVICE WILL BE CORRECTED.
- WARRANTIES THAT THE SERVICE WILL BE FREE FROM VIRUSES OR OTHER HARMFUL COMPONENTS.
- WARRANTIES REGARDING THE ACCURACY, COMPLETENESS, OR USEFULNESS OF ANY CONTENT OR INFORMATION PROVIDED THROUGH THE SERVICE.
THE SERVICE IS IN AN ALPHA/BETA PHASE AND MAY CONTAIN BUGS, ERRORS, AND INCOMPLETE FEATURES. YOU ACKNOWLEDGE THAT THE ENTIRE RISK ARISING OUT OF YOUR USE OF THE SERVICE REMAINS WITH YOU.
NO ADVICE OR INFORMATION, WHETHER ORAL OR WRITTEN, OBTAINED FROM US OR THROUGH THE SERVICE SHALL CREATE ANY WARRANTY NOT EXPRESSLY STATED IN THESE TERMS.
NOTHING IN THESE TERMS SHALL EXCLUDE OR LIMIT ANY WARRANTY THAT CANNOT BE LAWFULLY EXCLUDED OR LIMITED UNDER APPLICABLE LAW, INCLUDING THE LAWS OF ENGLAND AND WALES.
14. LIMITATION OF LIABILITY
TO THE FULLEST EXTENT PERMITTED BY APPLICABLE LAW:
- (a) IN NO EVENT SHALL RECONS LTD, ITS DIRECTORS, OFFICERS, EMPLOYEES, AGENTS, OR AFFILIATES BE LIABLE FOR ANY INDIRECT, INCIDENTAL, SPECIAL, CONSEQUENTIAL, OR PUNITIVE DAMAGES, INCLUDING BUT NOT LIMITED TO LOSS OF PROFITS, LOSS OF REVENUE, LOSS OF DATA, LOSS OF BUSINESS OPPORTUNITIES, LOSS OF GOODWILL, OR COST OF PROCUREMENT OF SUBSTITUTE SERVICES, ARISING OUT OF OR IN CONNECTION WITH YOUR USE OF OR INABILITY TO USE THE SERVICE, WHETHER BASED ON WARRANTY, CONTRACT, TORT (INCLUDING NEGLIGENCE), STRICT LIABILITY, OR ANY OTHER LEGAL THEORY, EVEN IF WE HAVE BEEN ADVISED OF THE POSSIBILITY OF SUCH DAMAGES.
- (b) OUR TOTAL AGGREGATE LIABILITY FOR ALL CLAIMS ARISING OUT OF OR RELATING TO THESE TERMS OR YOUR USE OF THE SERVICE SHALL NOT EXCEED THE TOTAL AMOUNT OF FEES PAID BY YOU TO US DURING THE TWELVE (12) MONTHS IMMEDIATELY PRECEDING THE EVENT GIVING RISE TO THE CLAIM. IF YOU HAVE NOT PAID ANY FEES, OUR MAXIMUM LIABILITY SHALL BE ZERO POUNDS STERLING (GBP 0).
- (c) THE LIMITATIONS IN THIS SECTION APPLY REGARDLESS OF THE FORM OF ACTION, WHETHER IN CONTRACT, TORT, STRICT LIABILITY, OR OTHERWISE, AND SHALL SURVIVE ANY TERMINATION OR EXPIRATION OF THESE TERMS.
NOTHING IN THESE TERMS SHALL EXCLUDE OR LIMIT LIABILITY FOR DEATH OR PERSONAL INJURY CAUSED BY NEGLIGENCE, FRAUD OR FRAUDULENT MISREPRESENTATION, OR ANY OTHER LIABILITY THAT CANNOT BE LAWFULLY EXCLUDED OR LIMITED UNDER THE LAWS OF ENGLAND AND WALES.
15. Indemnification
You agree to indemnify, defend, and hold harmless Recons Ltd, its directors, officers, employees, agents, and affiliates from and against any and all claims, liabilities, damages, losses, costs, and expenses (including reasonable legal fees) arising out of or in connection with:
- Your use of the Service.
- Your Content or any data you store, process, or transmit through the Service.
- Your violation of these Terms.
- Your violation of any applicable law or regulation.
- Your violation of any third-party rights, including intellectual property rights or data protection rights.
- Any claim by a third party related to personal data you stored in the Service.
16. Termination
- (a) You may terminate your account at any time by using the account deletion feature in the Service or by contacting us at support@mycorr.app.
- (b) We may suspend or terminate your account at any time, with or without cause, and with or without notice, including but not limited to violations of these Terms.
- (c) Upon termination, your right to use the Service will immediately cease. We may delete your Content and account data in accordance with our data retention policies as described in the Privacy Policy.
- (d) All provisions of these Terms that by their nature should survive termination shall survive, including but not limited to warranty disclaimers, limitation of liability, indemnification, and governing law.
17. Modifications to Terms
We reserve the right to modify these Terms at any time. When we make material changes, we will update the version number and effective date of these Terms and notify you through the Service. Material changes will require you to review and re-accept the updated Terms before continuing to use the Service. Your continued use of the Service after re-accepting the updated Terms constitutes your agreement to the changes.
18. Dispute Resolution
- (a) If any dispute arises out of or in connection with these Terms or your use of the Service, you agree to first attempt to resolve the dispute informally by contacting us at support@mycorr.app. We will attempt to resolve the dispute through good-faith negotiation for a period of thirty (30) days.
- (b) If the dispute cannot be resolved informally, either party may refer the dispute to mediation in accordance with the Centre for Effective Dispute Resolution (CEDR) Model Mediation Procedure.
- (c) If the dispute is not resolved through mediation within sixty (60) days, either party may bring proceedings in the courts of England and Wales.
19. Governing Law
These Terms shall be governed by and construed in accordance with the laws of England and Wales. Subject to the dispute resolution process in Section 18, the courts of England and Wales shall have exclusive jurisdiction over any disputes arising under these Terms.
If you are a consumer resident in the European Union, you shall also benefit from any mandatory provisions of the law of the country in which you are resident, and nothing in these Terms affects your rights as a consumer to rely on such mandatory provisions.
20. Severability
If any provision of these Terms is found to be invalid, illegal, or unenforceable by a court of competent jurisdiction, such provision shall be modified to the minimum extent necessary to make it valid and enforceable, or if modification is not possible, shall be severed from these Terms. The remaining provisions shall continue in full force and effect.
21. Entire Agreement
These Terms, together with the Privacy Policy, constitute the entire agreement between you and Recons Ltd regarding your use of the Service, and supersede all prior and contemporaneous agreements, proposals, representations, and understandings, whether written or oral.
22. Contact
If you have any questions about these Terms, please contact us at:
Recons Ltd London, United Kingdom support@mycorr.app
Privacy Policy
1. Introduction and Data Controller
This Privacy Policy explains how Recons Ltd ("Recons Ltd", "we", "us", or "our"), a company incorporated in England and Wales with its registered office in London, United Kingdom, collects, uses, shares, and protects your personal data when you use the MyCorr service ("Service").
Recons Ltd is the data controller for the personal data we collect directly from you in connection with your use of the Service. Where you store personal data of third parties in the Service, you are the data controller for that data and Recons Ltd acts as a data processor on your behalf (see Section 13).
This policy applies to all users of the Service worldwide. We comply with the UK General Data Protection Regulation (UK GDPR), the EU General Data Protection Regulation (EU GDPR), and the California Consumer Privacy Act (CCPA) as applicable.
2. Information We Collect
We collect the following categories of personal data:
- (a) Account Information: your name and email address, obtained through Google OAuth when you sign in to the Service.
- (b) User-Generated Content: database schemas, table data, model configurations, and any other data you upload, create, or store through the Service. This content is controlled by you and may contain personal data of third parties.
- (c) Usage Data: session metadata, including when multiplayer collaboration sessions start and end. This data is used solely for system monitoring and service improvement.
- (d) Technical Data: IP address, browser type and version, device information, and operating system. This data is collected automatically by our web servers.
- (e) Cookie Data: session authentication cookies necessary for the operation of the Service (see Section 10).
3. How We Collect Information
We collect personal data in the following ways:
- Directly from you: when you sign in via Google OAuth, create content, or contact us.
- Automatically: through cookies, server logs, and session monitoring when you use the Service.
- From third parties: your name and email address from Google when you authenticate via Google OAuth.
4. Legal Basis for Processing
Under the UK GDPR and EU GDPR, we process your personal data on the following legal bases:
- (a) Performance of a Contract (Article 6(1)(b)): processing necessary to provide you with the Service, including account creation, authentication, data storage, and collaboration features.
- (b) Legitimate Interests (Article 6(1)(f)): processing necessary for our legitimate interests, including service security, system monitoring, performance optimisation, and service improvement. Our legitimate interests do not override your fundamental rights and freedoms.
- (c) Consent (Article 6(1)(a)): where you have given specific consent for certain processing activities, such as optional features or communications. You may withdraw consent at any time.
- (d) Legal Obligation (Article 6(1)(c)): processing necessary to comply with applicable laws, regulations, or legal processes.
5. How We Use Your Information
We use your personal data for the following purposes:
- To provide, operate, and maintain the Service.
- To authenticate your identity and manage your account.
- To enable real-time collaboration features, including multiplayer sessions.
- To monitor and improve the performance, security, and reliability of the Service.
- To communicate with you about your account, including service updates and security notices.
- To respond to your requests and provide customer support.
- To comply with applicable laws and legal obligations.
- To enforce our Terms of Service and protect our rights.
We do not use your personal data for automated decision-making or profiling. We do not use your Content to train machine learning models.
6. Data Sharing and Subprocessors
We do not sell your personal data. We do not share your personal data with third parties for their own marketing purposes.
We share personal data with the following categories of service providers (subprocessors) who assist us in operating the Service:
- (a) Google Cloud Platform (Google LLC): cloud infrastructure hosting, authentication (OAuth), Google Sheets integration, and cloud storage. Data is hosted in Google Cloud Frankfurt (europe-west3), European Union.
- (b) Postmark (ActiveCampaign LLC): transactional email delivery for service-related communications.
- (c) Infrastructure providers: database and caching services operated on our cloud infrastructure.
All subprocessors are bound by data processing agreements and are required to protect your personal data in accordance with applicable data protection laws.
We may also disclose your personal data if required to do so by law, regulation, legal process, or governmental request, or if we believe in good faith that disclosure is necessary to protect our rights, your safety, or the safety of others.
7. International Data Transfers
Your personal data is hosted on Google Cloud Platform in Frankfurt, Germany (europe-west3), within the European Union.
If you access the Service from outside the European Union or United Kingdom, your data will be transmitted to and stored on servers in the EU. The UK has an adequacy decision with the European Union, permitting data transfers between the UK and EU without additional safeguards.
For transfers to jurisdictions outside the EU/UK that do not have an adequacy decision, we rely on appropriate safeguards such as Standard Contractual Clauses approved by the European Commission or the UK Information Commissioner's Office.
8. Data Retention
We retain your personal data as follows:
- (a) Account data (name, email): retained for as long as your account is active. Upon account deletion, your account data is deleted within 30 days.
- (b) User-generated content (schemas, table data): retained for as long as your account is active. Upon account deletion, your content is deleted in accordance with our data lifecycle policies.
- (c) Session metadata: retained for 7 days for system monitoring purposes, then automatically deleted.
- (d) Server logs (including IP addresses): retained for 30 days for security and debugging purposes, then automatically deleted.
- (e) Backup data: retained for up to 30 days after the original data is deleted, then purged.
We may retain certain data for longer periods where required by applicable law or to resolve disputes.
9. Your Rights
Depending on your location, you have the following rights regarding your personal data:
UK and EU Residents (UK GDPR / EU GDPR)
- Right of Access: you may request a copy of the personal data we hold about you.
- Right to Rectification: you may request that we correct inaccurate or incomplete personal data.
- Right to Erasure: you may request that we delete your personal data, subject to certain exceptions.
- Right to Restriction: you may request that we restrict the processing of your personal data in certain circumstances.
- Right to Data Portability: you may request a copy of your personal data in a structured, commonly used, machine-readable format.
- Right to Object: you may object to our processing of your personal data based on legitimate interests.
- Right to Withdraw Consent: where processing is based on consent, you may withdraw consent at any time without affecting the lawfulness of prior processing.
- Right to Lodge a Complaint: you have the right to lodge a complaint with the UK Information Commissioner's Office (ICO) at ico.org.uk, or with your local EU supervisory authority.
California Residents (CCPA)
- Right to Know: you may request information about the categories and specific pieces of personal data we have collected about you.
- Right to Delete: you may request that we delete the personal data we have collected from you, subject to certain exceptions.
- Right to Opt-Out: we do not sell your personal data. If this changes, we will provide a clear opt-out mechanism.
- Right to Non-Discrimination: we will not discriminate against you for exercising your CCPA rights.
Exercising Your Rights
To exercise any of these rights, please contact us at support@mycorr.app. We will respond to your request within 30 days (UK/EU GDPR) or 45 days (CCPA). We may request verification of your identity before processing your request.
You may also export your data directly from the Service using the built-in export features.
10. Cookies
We use only essential cookies necessary for the operation of the Service:
- Session Cookie: an authentication cookie that identifies your logged-in session. This cookie is set when you sign in via Google OAuth and expires when your session ends or after 7 days of inactivity.
We do not use tracking cookies, analytics cookies, advertising cookies, or any third-party cookies. We do not use any web beacons, pixel tags, or similar tracking technologies.
Because we use only strictly necessary cookies, no cookie consent banner is required under UK or EU law.
11. Data Security
We implement appropriate technical and organisational measures to protect your personal data, including:
- Encryption of data in transit using TLS/HTTPS.
- Encryption of data at rest.
- Fine-grained access controls using role-based authorisation.
- Regular security reviews and monitoring.
- Access to personal data limited to authorised personnel on a need-to-know basis.
- Secure authentication via Google OAuth (we do not store passwords).
While we take reasonable measures to protect your data, no method of electronic transmission or storage is completely secure. We cannot guarantee absolute security.
12. Children's Privacy
The Service is not directed at individuals under the age of 16. We do not knowingly collect personal data from children under 16. If we become aware that we have collected personal data from a child under 16, we will take steps to delete such data promptly. If you believe we have collected data from a child under 16, please contact us at support@mycorr.app.
13. Data Processing Terms
This section sets out the terms under which Recons Ltd processes personal data on your behalf when you act as a data controller by storing personal data of third parties in the Service.
- (a) Roles: when you store personal data of third parties in the Service, you are the data controller and Recons Ltd is the data processor. You determine the purposes and means of processing; we process such data only on your documented instructions.
- (b) Scope of Processing: we process your third-party data solely to provide, maintain, and secure the Service. We do not access, use, or disclose such data for any other purpose unless required by applicable law.
- (c) Security Measures: we implement appropriate technical and organisational measures as described in Section 11 to protect all data processed through the Service.
- (d) Sub-Processing: we engage the subprocessors listed in Section 6 to assist in providing the Service. We will notify you of any changes to our subprocessors by updating Section 6 of this Privacy Policy. You may object to a new subprocessor by ceasing to use the Service.
- (e) Breach Notification: in the event of a personal data breach affecting data we process on your behalf, we will notify you without undue delay, and in any event within 72 hours of becoming aware of the breach, providing the nature of the breach, the categories of data affected, and the measures taken to address it.
- (f) Audit Rights: upon reasonable written request and subject to appropriate confidentiality obligations, we will make available to you information necessary to demonstrate our compliance with these data processing terms.
- (g) Data Return and Deletion: upon termination of your account, you may export your data using the built-in export features of the Service. Following your request for account deletion, we will delete all data processed on your behalf in accordance with the retention periods set out in Section 8.
- (h) Data Protection Impact Assessments: upon reasonable request, we will provide you with information necessary to carry out a data protection impact assessment.
14. Your Obligations When Storing Third-Party Data
If you use the Service to store, process, or manage personal data of third parties (for example, customer records, employee data, or contact information), you acknowledge and agree that:
- You are the data controller for such data and bear full responsibility for compliance with all applicable data protection laws.
- You must have a lawful basis for collecting and processing such data.
- You must inform the relevant data subjects about the processing of their data, including the fact that their data is stored using the Service.
- You must respond to and fulfil any data subject requests (access, deletion, rectification, etc.) relating to such data.
- You must not store special category data (racial or ethnic origin, political opinions, religious beliefs, health data, biometric data, etc.) or criminal offence data in the Service unless you have ensured compliance with the additional requirements of applicable data protection law.
- Recons Ltd acts as a data processor only and accepts no responsibility or liability for your compliance with data protection laws regarding third-party data you store in the Service.
15. Changes to This Policy
We may update this Privacy Policy from time to time. When we make material changes, we will update the version number and effective date at the top of this policy and notify you through the Service. Material changes will require you to review and re-accept the updated policy before continuing to use the Service.
We encourage you to review this Privacy Policy periodically.
16. Contact
If you have any questions about this Privacy Policy or our data practices, or if you wish to exercise any of your data protection rights, please contact us at:
Recons Ltd London, United Kingdom support@mycorr.app
For data protection matters, you may also contact the UK Information Commissioner's Office (ICO) at ico.org.uk.